Flasher & Bait Helmet Setup - Salmon Fishing with Anchovy and Herring
Share
"I'm just a die-hard salmon fisherman that loves fishing with bait. Some days a herring in a bait head is the best rig that we use."
Trolling with the real deal - a herring or an anchovy in a bait helmet
There have been many, many times where a bait trolled behind a flasher has been the absolute best producer for our boats. Both herring and anchovies can be fragile, so we pin them into a plastic bait helmet to give them more durability and a longer duration on the troll. Our bait helmets of choice are from Krippled Fishing.

Flasher & Bait Helmet - Quick Rigging Guide and Gear
Flasher: Pro-Troll 11" Flasher or Gibbs 11" Highliner Flasher.
Bait Helmet: For Anchovy and smaller herring that is packaged as red label, use the Krippled Anchovy Helmet, for herring that is packaged as green or blue label, use the Krippled Herring Helmet.
Leader: 20 to 30 pound test in 32"" to 60" length. P-Line CFX or SS Leader Fluorocarbon, Maxima Ultragreen or Seaguar Fluorocarbon.
Hooks: We recommend Gamakatsu Octopus or Gamakatsu Big River hooks for your double-hook leader. If you are using Anchovy Helmets, use a 2/0 - 3/0 or a 3/0 - 4/0 hook combo. With Herring Helmets, use a 3/0 - 4/0 or a 4/0 - 5/0 hook combo. We offer pre-tied mooching leaders that work great with bait helmets.
Mainline: Braided mainline of 40 to 65 pound test P-Line X-Braid or Powerpro with a 25' to 30' topshot of 40 pound P-Line Fluorocarbon or Maxima Ultragreen. If you prefer to use a monofilament mainline, we recommend 20 to 25 pound P-Line CXX Strong, Maxima Ultragreen or Izorline.
Swivel: Tie one on the end of your mainline to avoid any line twist, either a Sampo Ball Bearing with Crosslock Swivel, Sampo Ball Bearing with Duolock Snap Swivel or P-Line Ball Bearing with Crosslock Snap Swivel. Because of the bait spin, you can avoid leader twist by cutting your leader in half and tying a Sampo Ball Bearing Swivel inline.
Preparing your bait for a day of trolling
Even high quality bait is going to need a little toughening up to help it last when you are trolling. We will put up our bait the night before a trip using Pro-Cure Brine & Bite, this will not only brighten up the bait but also toughen it and make it super durable. One container can cure upwards of 12 dozen baits, so needless to say it will last you quite a few day's worth of bait. Mix the suggested amount of water and brine powder together, place your frozen bait in there and allow to thaw and brine overnight in the fridge. Keep cool throughout the day to retain its durability.
RIgging your anchovies and herring for trolling behind a flasher
Rigging a bait in a helmet the first time can seem a little confusing, but it's really simple once you get the hang of it! There is a difference between rigging a bait in an anchovy helmet that uses a pin and a herring helmet that uses a toothpick, here are the steps...
Rigging an Anchovy Helmet
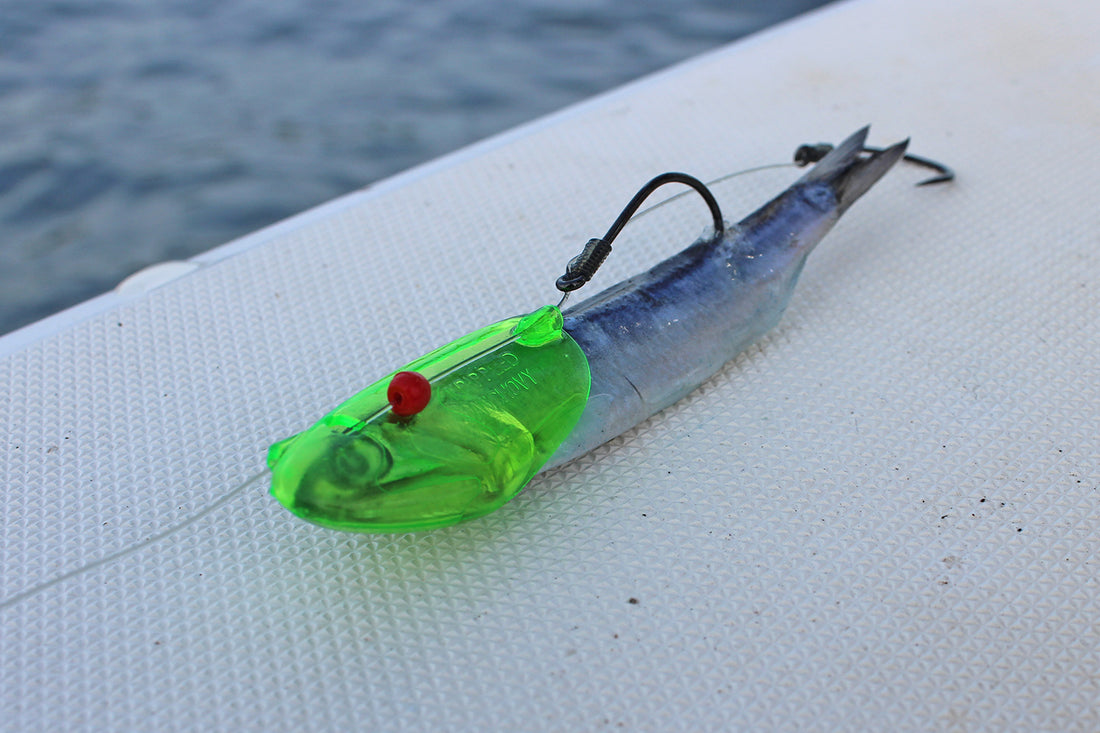
- Thread your two hook leader throught the helmet and pin as shown in the photo at the top of this page.
- Place the head of the bait in the helmet.
- Take the top hook at slide it into the side of the bait, you want a little space between the eye of the top hook and the plastic on the helmet where the leader goes in, then you want to pull the leader so the spacing dissapears, creating a slight bend in the bait. (Note that you can place the top hook into the bait with the point in the bait as shown, or reverse with the shank in the bait and the hook point exposed, your choice). The tailing hook should be free behind the bait.
Rigging a Herring Helmet
- Thread your two hook leader throught the helmet and take a half of a round toothpick and jam it into the back hole of the helmet so it sticks backwards towards where the bait will be placed.
- Bend your bait so that it will spin when trolling, and insert the toothpick into the side of the bait as you slide the head of your bait into the helmet.
- Take another round toothpick and push into through the holes in the side of the helmet, through the entire bait's head and slightly out the other side. This pins the bait into the helmet. Break off the exposed toothpick ends that are outside of the helmet.
- Take the top hook at slide it into the side of the bait, so that when you pull the leader tight, the eye of the top hook and the plastic on the helmet where the leader goes in are touching (Note that you can place the top hook into the bait with the point in the bait as shown, or reverse with the shank in the bait and the hook point exposed, your choice). The tailing hook should be free behind the bait.

